An Introduction to Git for Beginners and a Reference of Basic Git Commands
Introduction
What is git?git is a famous command line utility for version control in software development written by Linus Torvalds. Everyone doing serious software development uses version control, which is related to the familiar concept of saving a file. Suppose you're writing a computer program. As you progress, you save the file at different checkpoints ("file_v1", "file_v2", "file_v3"). git is an extension of this idea except, instead of saving a single file, it can take a snapshot of the state of all the files and folders in your project directory (a large codebase can contain hundreds of files). In git jargon, this snapshot is called a "commit" and, forever after, you can revisit the state of your project at this snapshot.
When do you use git?
- for programing projects, especially big or collaborative ones
- more generally, for anything you want to version control (e.g., a book or the content of a website)
- it's a safety net—you can rollback to a snapshot of your project at any previous time
- it's excellent for tracking your changes to code over time
- it's excellent for collaborating and sharing code
- it's excellent for making alternate or experimental versions of your project (branches)
- being git-literate is important in the era of GitHub, a wildly popular online code hosting site
- using GitHub (or, more generally, any remote repository) allows you to back up your codebase in the cloud—if your computer catches on fire, you won't have lost all of your work
Git Basics
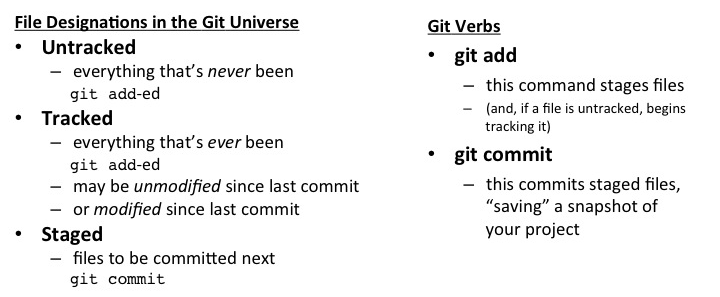
In the git world, you have a directory for some project, and this directory—which contains all the files and sub-directories of the project—is called a repository (or repo for short). Here are a few git terms to keep straight:- untracked
- tracked
- staged
$ git statusTo stage a file, enter:
$ git add somefileThink of staging as putting a file on deck or in the loading dock for your next commit. Moreover, if your file wasn't being tracked before, it is now and will be going forward (unless you actively tell git to stop tracking it). When you do commit:
$ git commit -m "This is my next commit"the file somefile gets committed and whatever changes you'd made to it become a permanent part of the fabric of the repository. Each commit is a snapshot of your repo at the time you make it. Note that only files which were staged are committed when you git commit; conversely, nothing happens to files you modified but didn't explicitly stage via git add. You can see your commits with:
$ git logAs my co-worker memorably put it:
Commits are the atoms of git.They form a complete historical record of your project and you can roll back the state of your files to any previous commit if you need to.
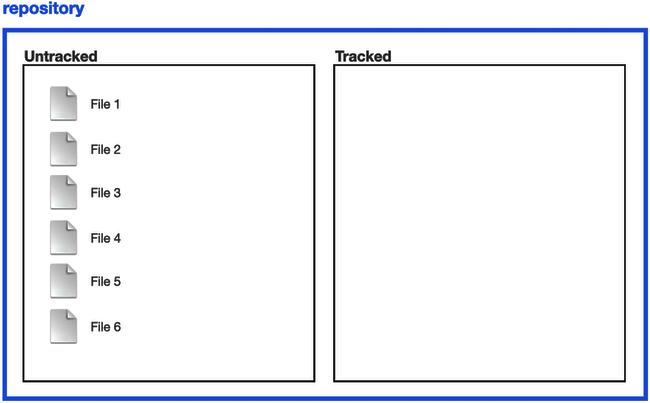
Here's a visual representation of files in a git repo, courtesy of amateurish Powerpoint graphics.
- Git passively alerts you untracked files are present in the repo, but has no business with them otherwise. In this figure, files 1 through 6 are just hanging out
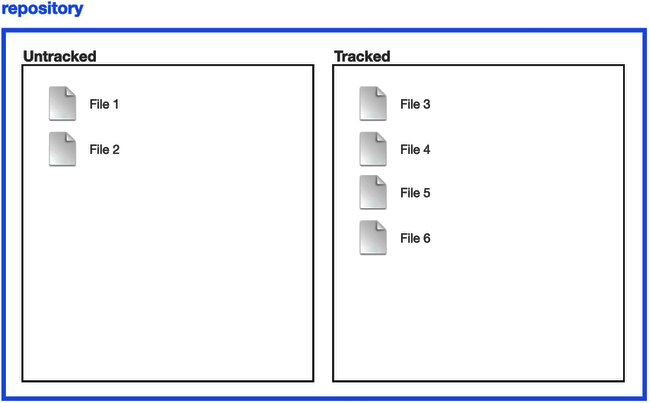
- Once files are tracked, git will alert you if they've been modified since the last commit when you enter git status. In this figure, files 3 through 6 are on git's radar going forward
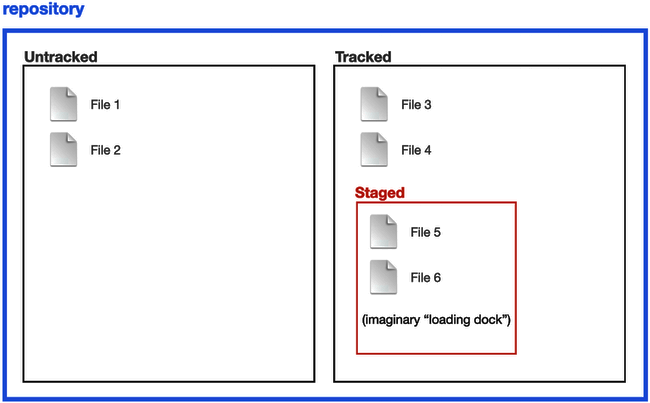
- Use git add to stage files for the next commit. In this figure, we've staged files 5 and 6
- Take a snapshot with git commit, so the current state of your repo is retrievable going into the future. This is a bit like the familiar "Save As" concept, except it can encompass more than one file. In our example, the changes we'd made to files 5 and 6 have been preserved in this commit
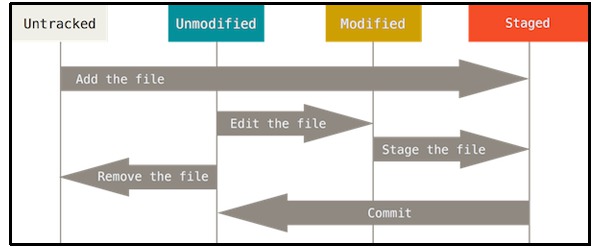
Git-scm.com has great online docs, which explains the git paradigm like this:
You have a bona fide Git repository and a checkout or working copy of the files for that project. You need to make some changes and commit snapshots of those changes into your repository each time the project reaches a state you want to record.Here's their accompanying figure:
Remember that each file in your working directory can be in one of two states: tracked or untracked. Tracked files are files that were in the last snapshot; they can be unmodified, modified, or staged. Untracked files are everything else – any files in your working directory that were not in your last snapshot and are not in your staging area. When you first clone a repository, all of your files will be tracked and unmodified because you just checked them out and haven’t edited anything.
As you edit files, Git sees them as modified, because you’ve changed them since your last commit. You stage these modified files and then commit all your staged changes, and the cycle repeats.
In practice, you may be cloning a repo from github.com or another remote repo and then pulling changes from it as it gets updated. Commits you make to your local copy of the repo won't affect the remote repo and, when you do a git status, you might see something like:
Your branch is ahead of 'origin/master' by 1 commit.
$ git pull
$ git push
An Example In Gory Detail
Let's see an example, in the goriest detail, to crystallize what we've learned so far. First, let's initialize a repository in a directory called test:$ mkdir test $ cd test $ git initA screenshot:

Now we'll make three files:
$ touch file1 file2 file3
$ git status
Screenshot:
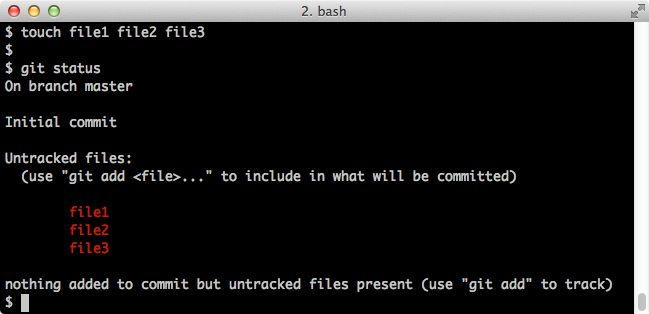
Note that these file are as yet untracked. Let's add some content to file1 and stage it (which will also cause it to be tracked from now on):
$ echo Joe >> file1
$ git add file1
$ git status
Screenshot:
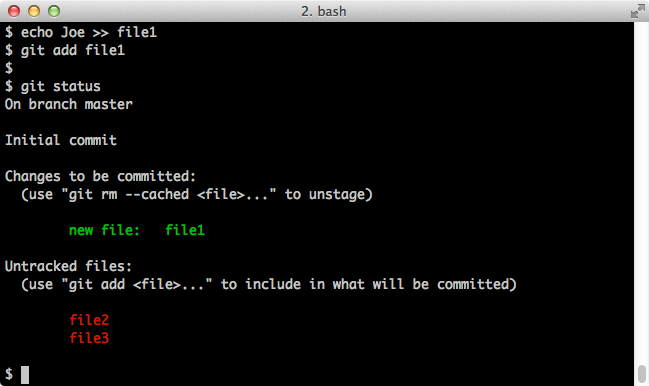
Now we'll do our first commit and commit file1:
$ git commit -m "Initial Commit"
$ git status
Screenshot:

And here's what our files look like at this point:
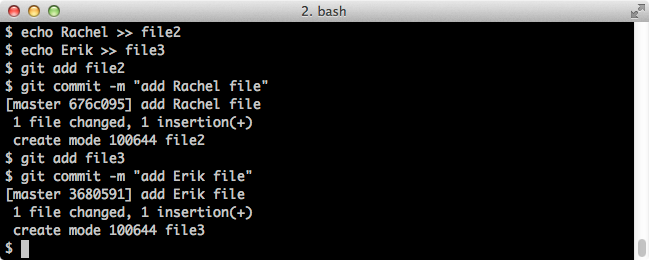
Let's get our other files into the mix:
$  echo Rachel >> file2
$  echo Erik >> file3
$  git add file2
$  git commit -m "add Rachel file"
$  git add file3
$  git commit -m "add Erik file"
Screenshot:
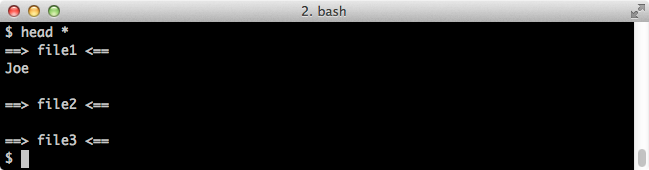
Let's check our status and files:
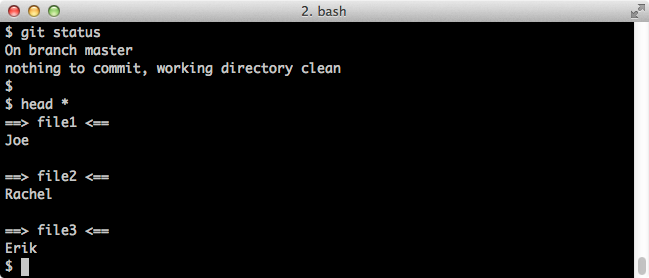
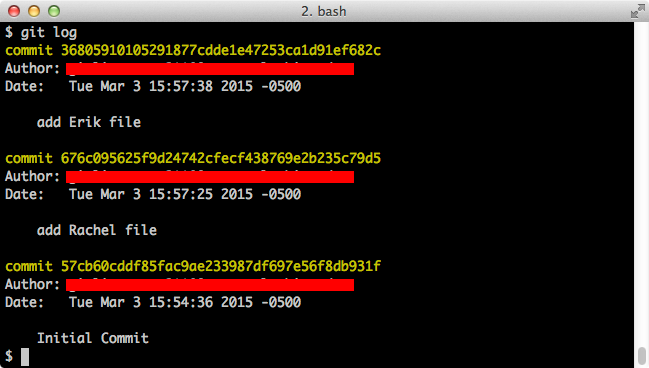
To see all of our commits, we can use:
$ git logwhich shows each commit's SHA-1 hash, message, author, etc.:
To look at a more succinct version of the commit log, use:
$ git log --oneline --decorate --graphScreenshot:

Note that the HEAD we see in this picture is a special git pointer that refers to our current position on the commit tree. We also see the word master, which tells us that we're on the master branch (more about this later).
If we update file1, we can see the differences vis-à-vis the repository:
$  echo 'Oh, no!' >> file1
$  git diff
Screenshot:
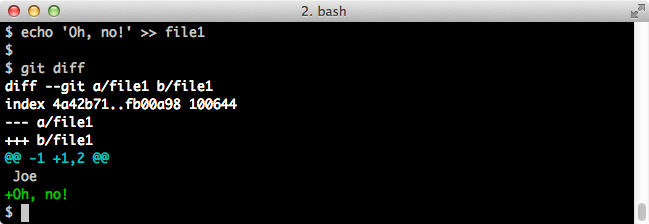
And git status tells us that file1 has been modified:
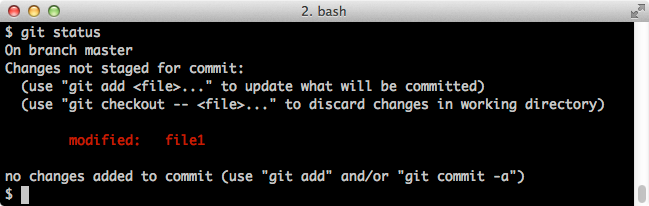
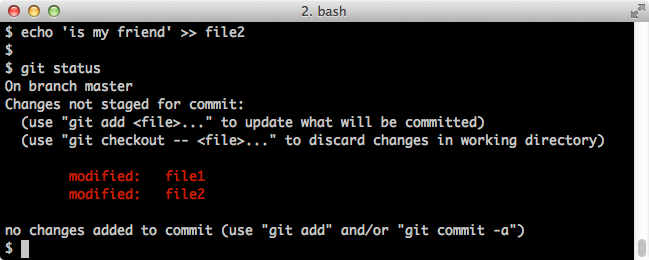
Let's modify file2, as well:
$ echo 'is my friend' >> file2
$ git status
Screenshot:
Now we'll stage them and commit them:
$ git add file1 file2
$ git status
$ git commit -m "add more text"
Screenshot:
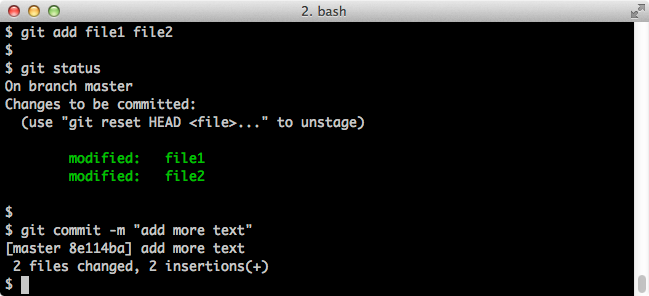
These are the basic mechanics of staging and committing.
An Example In Gory Detail, Continued - Branching
At this point, we're going to follow the docs and practice making a new branch. In git, a branch is a way to pursue the development of our project on a separate, parallel track. It's as if we're in a Choose-Your-Own-Adventure novel, but when we come to a fork in the road we can try both choices and toggle between the divergent paths whenever we like. Provided we haven't modified the same file in a contradictory way, we can also merge branches without conflict down the road. By default, there is only one branch—called the master branch—and we start on it.Let's create a new branch and make a commit. To create a new branch and switch to it, the syntax is:
$ git branch testing		# this creates a new branch
$ git checkout testing		# this switches to it
We could also do this in a one step shortcut as:
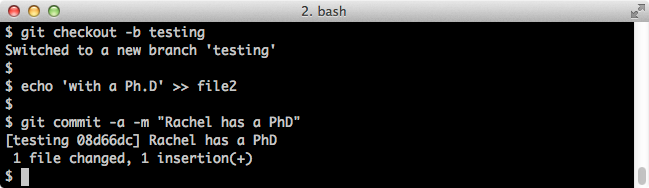
$ git checkout -b testing # create a new branch and check it out
Now that we're on the new branch, let's make our commit:
$ echo 'with a Ph.D' >> file2
$ git commit -a -m "Rachel has a PhD"
(The -a -m flags roll staging and committing into one step.)
Screenshot:
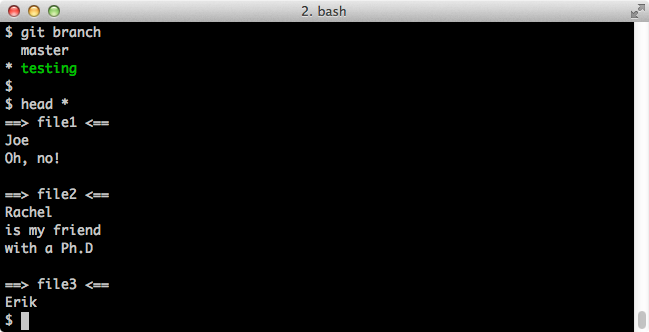
Now let's see which branch we're on and what our files look like:
$ git branch		# this shows all our branches
$ head *
Screenshot:
If we switch to the master branch:
$ git checkout master # this puts us on the master branch
we see:
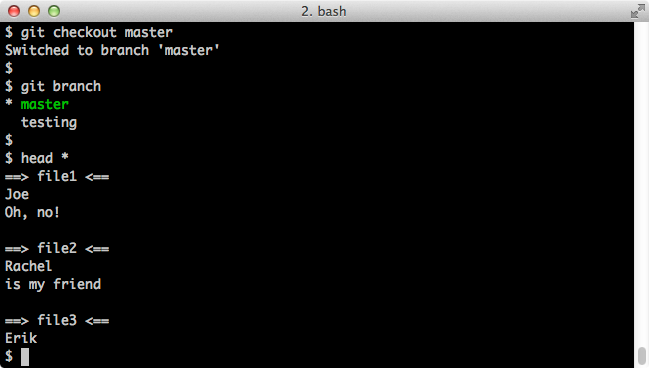
Note that file2 looks different here than it does on the testing branch.
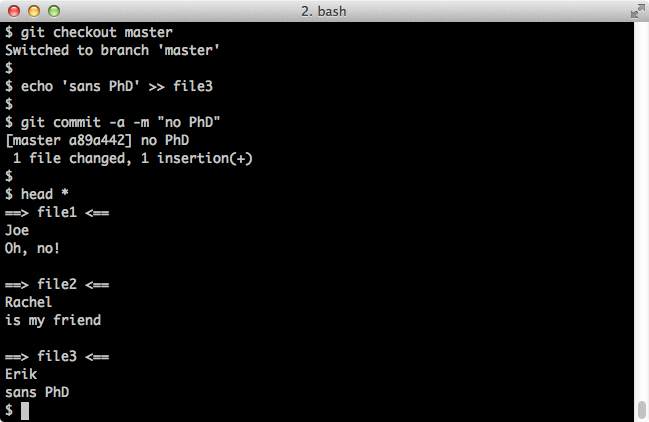
Let's work on the master branch and change file3:
$ git checkout master		# oops I'm repeating myself
$ echo 'sans PhD' >> file3
$ git commit -a -m "no PhD"
$ head *
Screenshot:
If we use the --all flag with git log, we can see the commit history of all branches:
$ git log --oneline --decorate --graph		# log of the current branch
$ git log --oneline --decorate --graph --all	# log of all branches
Compare --all flag off vs on:
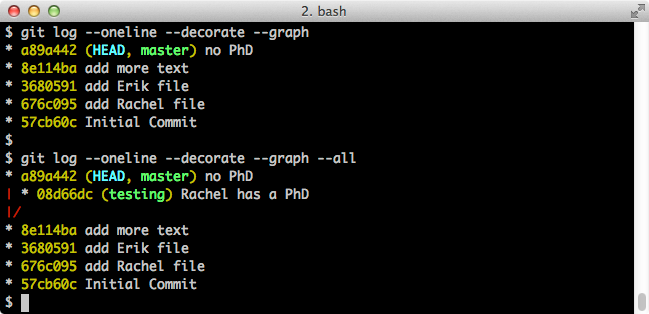
This shows a nice visual of the branch. One thing to note is that, with the exception of the very first commit, every commit has a parent. In this case, commits 08d66dc and a89a442 can share the same parent (8e114ba) because they're on different branches.
Since we have not modified the same files on the different branches in contradictory ways, we can merge the branches:
$ git merge testingNote that the git merge command merges the branch given as an argument (testing) onto the branch where you currently reside (master). Screenshot:
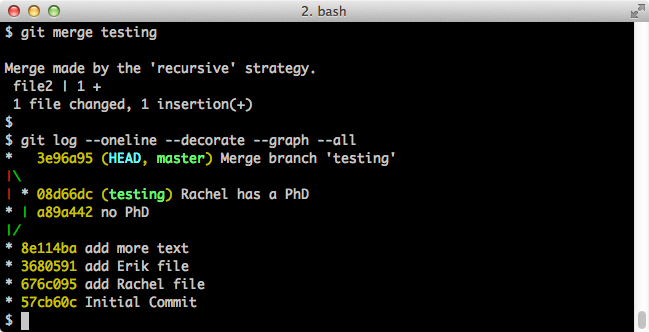
This yields:

incorporating the changes we made to the testing branch into the master branch.
In a coding project, the master branch is often reserved for pristine, working code. You might do your development on a dev or bugfix branch and merge the branches once you're satisfied your code is error-free.
Basic Git Commands
Now that we've seen an example, here are some basic git commands in a table:| command | function |
| git init | creates a git repository in the current folder |
| git init --bare | creates a bare repository in the current folder |
| git status | shows which files are untracked, which files are modified, and which files are staged |
| git ls-files | lists all files which are tracked |
| git add somefile | stages somefile (i.e., puts it on the loading dock for the next commit) |
| git add -u | stage only already tracked files (as opposed to all files) |
| git reset HEAD somefile | unstage somefile |
| git commit -m "my message" | commits staged files to the repo with "my message" |
| git log | shows all commits |
| git log --oneline --decorate --graph --all | shows commits graph on a single line (all branches) |
| git log -p somefile | show the change history of the file somefile only |
| git diff | shows what changes have been made in the repo with respect to the last commit |
| git diff myscript.py | shows what changes have been made specifically in myscript.py with respect to the last commit |
| git diff 2195928 6fa4d71 | shows the difference in the repo between commits 2195928 and 6fa4d71 |
| git diff --name-only 2195928 6fa4d71 | shows the file names of the files which changed between commits 2195928 and 6fa4d71 |
| git show 6fa4d71:somefile | shows somefile as it was in commit 6fa4d71 |
| git rm somefile | removes somefile from the repo |
| git rm --cached somefile | untracks somefile (i.e., removes it from the repo but does not delete it) |
| git clone git@github.com:x/myrepo.git | clones repo git@github.com:x/myrepo.git |
| git pull | pulls changes from remote repository |
| git push | pushes changes to remote repository |
| git push origin mybranch | pushes changes to remote repository mybranch branch |
| git branch | shows all branches |
| git branch mybranch | creates a new branch, mybranch |
| git checkout -b mybranch | creates a new branch, mybranch |
| git checkout mybranch | switches branches to mybranch |
| git merge mybranch | merge changes from the mybranch branch into the current branch (e.g., run from the master branch) |
| git checkout cfa8b79 | sends you back in time to the repository state at commit cfa8b79 (read-only) (use 'git checkout master' to return to the present) |
| git checkout cfa8b79 somefile | copies the file somefile as it was at commit cfa8b79 to the current repo |
| git checkout -- somefile | reverts somefile to its state at the most recent commit (warning: you lose your uncommitted modifications) |
| git reset --hard cfa8b79 | roll your repo back to commit cfa8b79 (warning: use with extreme caution! This irreversibly obliterates everything after commit cfa8b79) |
Remotes
Git repositories begin their lives in two ways. Way #1, you initialize one in the cwd:$ git initWay #2, you clone a preexisting one from somewhere else:
$ git clone somerepositoryIf your repository began its life the latter way, you're dealing with remotes. You can see the name of the remote repo and its location by entering:
$ git remote -vBy default, the remote repo is called "origin".
Once you've cloned a (remote) repo, no changes you make on your local repo will affect the remote one, and vice versa, unless you explicitly sync them. The way to send your changes to the remote repo is:
$ git pushSimilarly, to grab changes from the remote repo and sync them with your local repo, it's:
$ git pullIf you're dealing with branches, you can explicitly specify the branch name you want to pull from or push to, as in:
$ git pull origin mybranch
$ git push origin mybranch
In general, you can always pull from a remote repo, but you won't be able to push your changes to it (think of code on GitHub) unless you have permission.
Let's backtrack and consider the other scenario where you didn't clone a remote repo. You can always associate your repo with a remote (or even multiple remotes) with the command git remote add <name> <url>.
What is GitHub?
GitHub.com and Bitbucket.org are two popular sites that host git repositories online. They provide a web GUI for git, and are a convenient way to work on shared repos with collaborators and publish source code. At its core, the essence of GitHub is this: it's a server. But it's a special server that only allows one to run commands in the git ecosystem. This alone (nothing to do with the web yet!) would make it a very useful tool for backing up your code base and for sharing. However, GitHub adds value to this simple concept by providing a web interface with user accounts, permission management, issue trackers, etc. Remember remotes, which we learned about in the last section? GitHub is the most popular place to host a remote.GitHub offers public repos for free, but you have to pay for private ones (with unlimited collaborators). Bitbucket offers free public and private repos, but you have to pay if you want private ones with more than 5 collaborators.
Generating ssh Keys for GitHub
On your local computer, generate rsa ssh keys:$ mkdir -p ~/.ssh && cd ~/.ssh $ ssh-keygen -t rsa -f localkeyThis will create two files on your computer, a public key:
~/.ssh/localkey.pub
~/.ssh/localkey
Host github.com
    IdentityFile ~/.ssh/localkey
cat your public key and, on github.com, paste it into:
Settings > SSH Keys > Add SSH Key
Getting permission errors? See this help page. Or try:
$ eval "$(ssh-agent -s)"
$ ssh-add -K ~/.ssh/localkey
Follow the tutorial on the official docs.
Setting Up a Repo with GitHub
Suppose you've made an empty repo on GitHub and now you want to make an empty repo on your local machine that can pull changes from, and push changes to, your GitHub repo. GitHub gives us the recipe for doing that. First, we'll make a repo on our local machine and make an initial commit:$ mkdir myGitRepo # make directory $ cd myGitRepo $ echo '# myGitRepo' > README.md # make README file $ git init Initialized empty Git repository in /home/myGitRepo/.git/ $ git add README.md $ git commit -m 'first commit, add README' # commit to local repo [master (root-commit) 0b509a7] first commit, add README 1 file changed, 1 insertion(+) create mode 100644 README.mdNow, we'll hook it up to Github by adding the appropriate remote:
$ git remote add origin git@github.com:myGitHubUserName/myGitRepo.git
$ git remote -v # double check it's hooked up
origin  git@github.com:myGitHubUserName/myGitRepo.git (fetch)
origin  git@github.com:myGitHubUserName/myGitRepo.git (push)
Finally, we'll sync our local changes to our remote GitHub repo:
$ git push -u origin master # push to remote GitHub repo
Counting objects: 3, done.
Writing objects: 100% (3/3), 232 bytes | 0 bytes/s, done.
Total 3 (delta 0), reused 0 (delta 0)
To git@github.com:myGitHubUserName/myGitRepo.git
 * [new branch]      master -> master
Branch master set up to track remote branch master from origin.
Setting Up a Repo with Bitbucket
Make a repo and then, to quote the docs:$ mkdir /path/to/your/project $ cd /path/to/your/project $ git init $ git remote add origin git@bitbucket.org:myuser/myrepo.gitFor a first commit, you could make a README file:
$ echo "This is a README" > README.txt
$ git add README.txt
$ git commit -m 'Initial commit'
$ git push -u origin master
Bare Repos
As we've seen, the command to initialize a git repo in the cwd is:$ git initHowever, you can also initialize a bare repo:
$ git init --bareWhat's the difference? A bare repository has no working files. Instead, it has only the full commit history. You can find this folder in your regular (non-bare) repositories, too—it's in the hidden folder named .git. Jon Saints on this site describes the bare repository's raison d'être:
What is the difference between a repository created using the git init command and the git init --bare command?As he says, bare repos come into play when you want a central repo shared among collaborating users all making changes to the code. GitHub is a good example.
Repositories created with the git init command are called working directories. In the top level folder of the repository you will find two things:Repositories created with git init --bare are called bare repos. They are structured a bit differently from working directories. First off, they contain no working or checked out copy of your source files. And second, bare repos store git revision history of your repo in the root folder of your repository instead of in a .git subfolder. Note… bare repositories are customarily given a .git extension.
- A .git subfolder with all the git related revision history of your repo
- A working tree, or checked out copies of your project files.
Why use one or the other?
Well, a working repository created with git init is for… working. It is where you will actually edit, add and delete files and git commit to save your changes. If you are starting a project in a folder on your dev machine where you will add, edit and delete files of your project, use "git init". Note: if you git clone a repository you will be given a working repository with the .git folder and copies of the working files for editing.
A bare repository created with git init --bare is for… sharing. If you are collaborating with a team of developers, and need a place to share changes to a repo, then you will want to create a bare repository in centralized place where all users can push their changes (often the easy choice is github.com). Because git is a distributed version control system, no one will directly edit files in the shared centralized repository. Instead developers will clone the shared bare repo, make changes locally in their working copies of the repo, then push back to the shared bare repo to make their changes available to other users.
Because no one ever makes edits directly to files in the shared bare repo, a working tree is not needed. In fact the working tree would just get in way and cause conflicts as users push code to the repository. This is why bare repositories exist and have no working tree.To summarize
I use a working directory created with git init or git clone when I want to add, edit and delete files in myproject locally on my dev machine.
When I am ready, I share my local changes with a git push to a bare repository myproject.git (usually on a remote server like github.com) so other developers can access my local changes.
Suppose you want to use a thumbdrive on which to carry your git repository, sync-ing it to different computers when needed. Go to this external HD and make a bare repo:
$ mkdir myRepo.git
$ cd myRepo.git
$ git init --bare
Note that we are using the extension .git for the bare repository, as is the convention.
Navigate back to your local repo (not the bare one!), and we'll add the thumbdrive repo as a remote. Let's call the thumbdrive repo
external:
$ git remote -v # check this first
$ git remote add external /path/to/myRepo.git
$ git remote -v # now confirm it was added
Now we can push to it:
$ git push external masterOr pull from it on another computer. We are not planning to do any coding on the thumbdrive, just as we don't edit files on GitHub.
If you did this on a server in the cloud—say, an EC2 instance—what you'd have would start to feel GitHub-like. It's crazy to reflect that the multi-million dollar business of GitHub is, at its core, just a server plus an open source linux utility.
More on Branching
We've already learned the concept of branching in git. Let's reiterate why it's useful: to preserve a "master" branch of pristine, bug-free code and pursue an alternate track of development with impunity. If you want to go off and make some experimental or rough changes, make a branch. If you're satisfied with the changes on your branch, you can merge your branch with the master branch. I advocate branching often, since branches are cheap and we can delete them away when we please. Branches are particularly useful when collaborating on a project. Each developer on a project may have his own branch and merge to the master repository when the group approves it.Now let's look at some syntax. To create a new branch called dev, it's:
$ git branch devOne note here: typically, you'll make your branch from the master branch, but you might also have occasion to make a branch while residing on another non-master branch. Intuitively, your branch will start its life as a copy of whichever branch you make it from.
To see your branches, type git branch:
$ git branch
* master
  dev
To switch to dev:
$ git checkout devNow we're on dev:
$ git branch
  master
* dev
Suppose we make some changes to dev and want to return to the master branch. That's:
$ git checkout masterNow that we're back on the master branch, suppose we want to merge the changes from the dev branch into it. That's:
$ git merge devConversely, if we were on the dev branch, merging changes from the master branch onto dev would be:
$ git merge masterTo delete the branch dev:
$ git branch -D devTo show a file, myfile.txt, from some other branch (without changing branches) (via Stackoverflow):
$ git show someotherbranch:myfile.txtTo copy a single file, myfile.txt, from some other branch to the current branch (via Stackoverflow):
$ git checkout someotherbranch myfile.txt # copies myfile.txt to current branch
To push changes to the remote repository dev branch:
$ git push origin devTo grab a remote (non-master) branch from GitHub:
$ git checkout -b remotename origin/remotenameFinally, here's a trick to display the branch of the git repository you're on in your bash prompt.
Manipulating Files from Different Commits
If you want to see the (uncommitted) changes you've made since your last commit, the command is:$ git diffThis can be a useful reminder before you commit if you're wondering, "What changes did I make, again?"
To discard uncommitted changes to myfile, it's:
$ git checkout -- myfileIf you want to see the difference between commits 104bdb6 and 11ad3dd, the syntax is:
$ git diff 104bdb6 11ad3ddIf you want to see only the names of the files that changed between 104bdb6 and 11ad3dd, it's:
$ git diff --name-only 104bdb6 11ad3ddIf you want to track how a specific file, myfile.cpp, changed between commits 104bdb6 and 11ad3dd, it's:
$ git diff 104bdb6 11ad3dd myfile.cppIf you simply want to see what myfile.cpp looked like in commit 11ad3dd, that's:
$ git show 11ad3dd:myfile.cppThe command git checkout is overloaded with meaning: you can check out a branch, a file from a past commit, or a past commit itself. We've already seen how to check out a branch. If you want to see what your repository looked like at commit 104bdb6, you can browse the repository in a read-only fashion at this snapshot by checking out the commit:
$ git checkout 104bdb6Somewhat confusingly, this puts you in a 'detached HEAD' state, which means, as explained in the official docs, that HEAD points to a specific commit as opposed to a branch (try entering git branch and you'll see you're on no branch). In any case, to get back to the current commit, just check out the master:
$ git checkout masterIf you want to grab a specific file from a past commit (say, file myfile.cpp from commit 104bdb6), the command is:
$ git checkout 104bdb6 myfile.cppHowever, be careful with this one. If you have uncommitted changes to myfile.cpp, they will be overwritten and you will lose them!
Remotes, Part II
We've already covered how to see the remote repository you're pushing to and pulling from (in case you forgot what you cloned):$ git remote -vYou may have occasion to hook up your repository to a different remote than the one with which you started. If that's the case, try:
$ git remote set-url origin git@github.com:GitHubProfile/differentrepo.gitAnother way to go about this is to add an additional remote, rather than overwriting the original. Suppose you've cloned somebody else's repository from Github or Bitbucket onto your local machine. You create your own branch and do some development work and now you want to push your changes to the server, but you don't have write permission to the author's Github. You can fork the author's repository on Github or Bitbucket (i.e., make a server-side clone into your own account). On your local machine, you can add your fork as a remote:
$ git remote add oli https://bitbucket.org/myusername/myrepoAs already remarked, you push to the origin remote, master branch, by default:
$ git push origin masterI.e.,
$ git pushfor short. However, now you can push to your forked remote (oli in my example), say branch odev:
$ git push oli odev
Miscellaneous
Fixing a Mistaken Commit Message
If you want to change the message from your last commit, use the --amend flag:$ git commit --amend -m "This is the commit message I meant to use"
Cloning a Repo with Sub-Repos
To clone a repo that has repos inside it, use the recursive flag:$ git clone --recursive git://github.com/some_repo
Get Information about a Git Repo in a JSON
$ curl https://api.github.com/repos/gituser_name/gitrepo_name
Overwriting Local Changes in a Git Pull
To overwrite local changes and restore a repo to its state on the remote server (origin/master), it's:$ git fetch --all $ git reset --hard origin/master
Git Aliases
Here are some useful command line aliases for git:alias gg="git log --oneline --decorate --graph --all" alias gs="git status" alias ga="git add" alias gc="git commit -m" alias gac="git commit -a -m" alias gp="git pull" alias gpush="git push" alias gl="git log" alias gb="git branch" alias gch="git checkout" alias gls="git ls-files" alias gd="git diff"

© oliverelliott.org, 2026.
All Rights Reserved.
All Rights Reserved.